Saturday, August 27, 2011

La fin - Homemade art shelf part TWO

Sooo my art shelf is all finished!

First of all, if you don't remember art shelf part 1, please refer to this post.

Basically where I left off, everything was done except for the top, caulking, painting, the siding for the back, and moving it into my classroom.

The first thing that I needed to do was go to Home Depot and get paint.

Simple, right?

Obviously you've never been out with me.

Apologies to Home Depot for this one.

Anyway. Let's move past that, shall we?

The first thing I had to do was caulk the cracks in all the corners. If you haven't used caulking, it's FUN. Really, it's super satisfying, it's like playdoh mixed with glue and it makes everything pretty. It's awesome. 
 Then I had to paint the wainscoting that I bought for the back pieces. 
 While I waited for Cody to come cut the wainscoting, I started painting!
 And painting.
 Then Cody began attaching the back panels. While I painted.
 And painted.
 And then.. it was DONE!
 I absolutely adore it. It reminds me of Cape Cod, and I feel so happy everytime I see it. Especially when you know what shelf it's replacing.
 See? This is what my art supplies were stored on before.
 And here they are now!
Huge thanks to Cody for all of the help with this project. I am not confident with power tools yet, so he did all of the hard work while I held things and used Gorilla Glue and made sound effects (read: eeee ee ee e ee oooh ooh ahh ahh.)


Aaaaaaaaaand that's it!

Friday, August 26, 2011

My biggest project to date


This is the first time I'm going to post a half finished project, only because I have been on it for the past month and we made such progress today and I want to share!

Basically, I decided about a month ago that I really wanted to have a great art shelf for my classroom. Something like this. But look at the price!! Obviously I don't have that kind of money. So one day while I was working at the daycare, I drew up what my dream cabinet would look like:I even tried to write down measurements, so that Joel would be more willing when I asked him to make it for me. Joel and Cody took me to Home Depot, and we bought a huge piece of MDF (which was terrifying to bring home, but I won't start on that.)

When I got the MDF home, I traced out all of the pieces onto it (which I planned on a piece of paper first) so that Joel and Cody could make the cuts. A couple of days later, I had this:
I did a REALLY quick, sloppy white coat of paint on the pieces as a base. These sat in our living room for a few weeks, until today, when Cody and I finally got a chance to go out and build the start of my DREAM SHELF! I took some pictures as we worked. Cody did all of the nailing, but I had the important job of putting GORILLA GLUE on everything. Here's me holding the bottle:
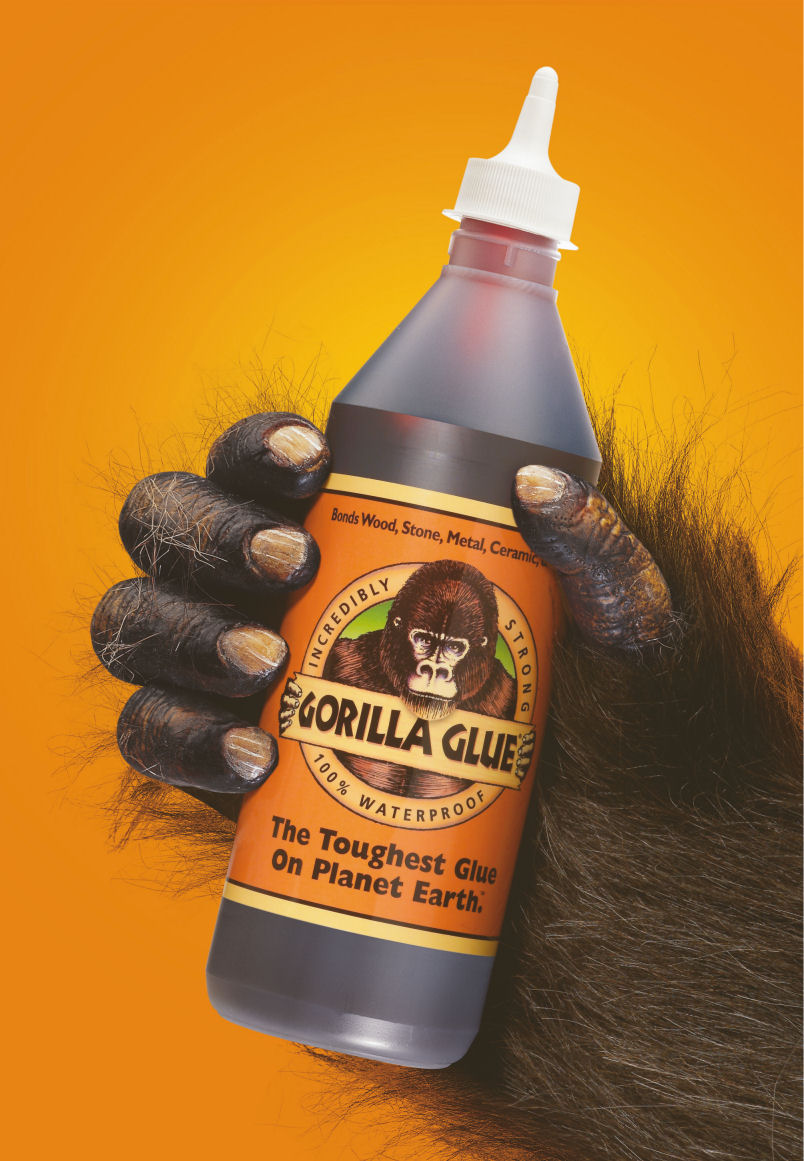
I did appropriate sound effects every time I glued, don't worry.


Great paint job, huh?
This is where I will store tupperware buckets full of markers, pencil crayons, etc.

I must have been Gorilla Glue-ing in a lot here, because there are no more pictures until the end:

Yay! The right side is for tupperwares, and random supplies on the top. On the left side, paint bottles will go on the bottom, legal sized paper on top, and the three shelves above are for regular sized paper. Beside that, I will put scrapbooking papers standing up.

Isn't it wonderful?
Here's what's left to do:
  • Buy a bit more MDF for the top
  • Buy thin slats of wood for the back
  • Caulk the little gaps between the shelves
  • Paint the whole shelf the color of the second swatch here
  • Decide if I want to do a lip around the top
Hopefully I will be done this next week, so I can put it in my class before the beginning of school!

Saturday, August 13, 2011

My new lamp!

Today I completed my project of turning this
into thisWhen we were on vacation in Maine a few weeks ago, I saw this amazing lamp at an antique store that was worth the effort of hauling home on the 9 hour car trip. I paid $20 for it. The thing I liked most about it was the eagle on the lamp base:The first thing I did was trace the lampshade onto bristol board and cut off the old lamp shade (it was garbage bag material, just wound around the wire!)

I decided to cover it using an idea I had seen on mama-says-sew, which was for a nice, ruffly lampshade. I bought a rough, almost burlap-like fabric to cover the bristol board with.

First, I cut it into strips:
Then I ironed them down the center so that there would be less hangy threads (without having to do any sewing).
and I was left with this:

Then came the VERY long process of gluing the little strips onto the bristol board!

Basically I would just put glue either on the board or on the piece, and desperately try to get it glued on nicely before it dried or I burnt myself.
As a result, there are some big clumps of glue hidden nicely under the fabric. My fingers are also quite burnt.This took several hours to finish, and got really boring after a while! I definitely had to split it up into several sessions to save my sanity (and my fingers.)

Next, I took the lamp outside and got to spraypainting:
Thennnn all I had to do was put the lampshade on and:
Very happy with this little guy!

Wednesday, August 10, 2011

Homemade pocket chart! $10

Yesterday I took on the task of making my first ever pocket chart. I use a pocket chart in my class as the class store, but it's pretty hideous and I really don't like the blockey colors.

First, I started by purchasing .75 meters of this fabric ($2.50) and 1 meter of vinyl ($3).
I ironed about an inch and a half around the edges, and flipped itover a second time, to get a crisp edge without having to do too much sewing:Then, I took the vinyl, and cut out four strips,that were the length of the fabric and about 7 inches tall. When it was all cut, I laid it out on the fabric to eyeball everything (very hard to see!) Next, I cut out some small vinyl pieces to act as little slots to place tags. After everything was cut, I pinned on tape binding to all of the edges.
This is what it looked like once the vinyl pouches were sewn onto the pockets.Sewing the vinyl to the fabric was a bit of a task. It's difficult to sew because the vinyl tends to get caught on the presser foot of the sewing machine. Finally, I ended up pinning paper towel to the top of all of the vinyl, so that it would slide easily. It just took forever, but really made the process so much easier. When I was done the sewing, I just ripped the paper towel out. It came out quite easily.
And, that was really it! I just had to sew, sew, sew, all along the corners and edges until I had pockets (basically wherever you see paper towel in the picture.) I'm really happy with how it turned
This is what it looks like stocked! (there's still some goodies missing from the more "expensive" pockets.. not sure what to put in those, yet!)
The entire thing cost under ten dollars. I will definitely be making more!